
Schedule a recurring experiment with AWS Fault Injection Simulator (FIS)
Chaos Engineering on AWS

Chaos Engineering on AWS

Running chaos experiments periodically can be very useful, especially if you want to ensure that your application’s resilience isn’t regressing as your application evolves.
Until recently, customers had to use their own tools or built their own scheduling capabilities. This added complexity, slowed application development, and increased costs.
This is now a thing of the past!
Amazon EventBridge Scheduler just announced a new capability that lets you schedule one-time or recurrent tasks across many AWS services — including AWS Fault Injection Simulator (FIS), without provisioning or managing underlying infrastructure.
This new capability from EventBridge means you can now easily schedule AWS FIS experiments without having to handle any of the supporting infrastructure.
This blog post explains how to use Amazon EventBridge Scheduler to trigger an AWS FIS experiment every 10 minutes.
Buckle up!
Create an EventBridge Scheduler
Prerequisites
An AWS account. Create an account for free.
An AWS FIS Experiment. Get started with FIS.
Ensure you also create the IAM role to execute an FIS experiment.
For this blog post, we are using an FIS experiment that will exhaust the CPU of all EC2 instances in a particular VPC. You can, of course, use any FIS experiment template you may already have.
Here is the one we are using:
{
    "description": "CPU stress on all instances in VPC. Uses the FIS provided document AWSFIS-Run-CPU-Stress",
    "targets": {
        "instanceTargets": {
            "resourceType": "aws:ec2:instance",
            "resourceTags": {
                "FIS-Ready": "true"
            },
            "filters": [
                {
                    "path": "State.Name",
                    "values": [
                        "running"
                    ]
                },
                {
                    "path": "VpcId",
                    "values": [
                        "vpc-xxxxxxxxxxx"
                    ]
                }
            ],
            "selectionMode": "ALL"
        }
    },
    "actions": {
        "instanceActions": {
            "actionId": "aws:ssm:send-command",
            "description": "CPU stress via SSM",
            "parameters": {
                "documentArn": "arn:aws:ssm:us-east-1::document/AWSFIS-Run-CPU-Stress",
                "documentParameters": "{\"DurationSeconds\":\"120\",\"InstallDependencies\":\"True\",\"CPU\":\"0\"}",
                "duration": "PT2M"
            },
            "targets": {
                "Instances": "instanceTargets"
            }
        }
    },
    "stopConditions": [
        {
            "source": "aws:cloudwatch:alarm",
            "value": "arn:aws:cloudwatch:us-east-1:<your-aws-account-id>:alarm:NetworkInAbnormal"
        }
    ],
    "roleArn": "arn:aws:iam::<your-aws-account-id>:role/FISRole",
    "tags": {
        "Name": "StressCPUallInstancesVPC"
    }
}
If you want to reuse this FIS experiment template, you will need to have EC2 instances running. Then, create a file (e.g., CPUfault.json) and copy the above template in it.
To create the FIS experiment template:
aws fis create-experiment-template --cli-input-json file://CPUfault.jsonThe response you get back gives you an Experiment Template ID that I call <your-experiment-template-id> for the rest of the blog post. Save that ID, it is used in the aws scheduler create-schedule request needed to set the scheduler below.
For more details of creating an FIS experiment, check this tutorial.
Tag the Experiment template with the tag Purpose=Schedule. We use tags for scoping the permissions.
aws fis tag-resource --resource-arn arn:aws:fis:us-east-1:<your-aws-account-id>:experiment-template/<your-experiment-template-id> --tags Purpose=ScheduleScheduler Permissions — Trust Policy
For EventBridge Scheduler to be allowed to assume the role on your behalf, you will need to set a trust policy. Copy the following assume role JSON policy and save it locally as Scheduler.json.
{
"Version": "2012-10-17",
    "Statement": [
        {
            "Effect": "Allow",
            "Principal": {
                  "Service": "scheduler.amazonaws.com"
            },
            "Action": "sts:AssumeRole"
        }
    ]
}
Create a new custom IAM role. You can replace the value for --role-name with any name you'd like to assign to the role. That role will assume the trust policy defined above.
aws iam create-role --role-name FISSchedulerRole --assume-role-policy-document file://Scheduler.jsonIf successful, you’ll see a similar output as the following:
{
    "Role": {
        "Path": "/",
        "RoleName": "FISScheduler",
        "RoleId": "BR1L2DZK3K4CTL5ZF9EIL",
        "Arn": "arn:aws:iam::<your-aws-account-id>:role/SchedulerExecutionRole",
        "CreateDate": "2022-03-10T18:45:01+00:00",
        "AssumeRolePolicyDocument": {
            "Version": "2012-10-17",
            "Statement": [
                {
                    "Effect": "Allow",
                    "Principal": {
                        "Service": "scheduler.amazonaws.com"
                    },
                    "Action": "sts:AssumeRole"
                }
            ]
        }
    }
}
Scheduler Permissions —Access Policy
Add an access policy to allow EventBridge Scheduler to invoke AWS FIS Start-Experiment. To do so, copy the following JSON permission policy and save it locally as FISStartPermissions.json.
{
    "Version": "2012-10-17",
    "Statement": [
        {
            "Effect": "Allow",
            "Action": "fis:StartExperiment",
            "Resource": "arn:aws:fis:*:*:experiment/*"
        },
        {
            "Effect": "Allow",
            "Action": "fis:StartExperiment",
            "Resource": "arn:aws:fis:*:*:experiment-template/*",
            "Condition": {
                "StringEquals": {
                    "aws:ResourceTag/Purpose": "Schedule"
                }
            }
        }
    ]
}
This policy lets only the FIS experiment templates tagged with Purpose=Schedule to be executed by the EventBridge Scheduler.
You could also use the following policy:
{
    "Version": "2012-10-17",
    "Statement": [
        {
            "Effect": "Allow",
            "Action": "fis:StartExperiment",
            "Resource": [
                "arn:aws:fis:*:*:experiment-template/<your-experiment-template-id>",
                "arn:aws:fis:*:*:experiment/*"
            ]
        }
    ]
}
This policy lets only a particular template — <your-experiment-template-id> to be executed by the EventBridge Scheduler.
Pick the policy that best fits your threat model and run the following command to create a new managed policy. Replace the value for --policy-name with any name you'd like to assign to the policy.
aws iam create-policy --policy-name FISStartExperimentPolicy --policy-document file://FISStartPermissions.jsonIf successful, you’ll see the following output.
{
    "Policy": {
        "PolicyName": "FISStartExperimentPolicy",
        "PolicyId": "ANPAUWGLWB5ZPAPHA5S2D",
        "Arn": "arn:aws:iam::<your-aws-account-id>:policy/FISStartExperimentPolicy",
        "Path": "/",
        "DefaultVersionId": "v1",
        "AttachmentCount": 0,
        "PermissionsBoundaryUsageCount": 0,
        "IsAttachable": true,
        "CreateDate": "2022-11-11T14:01:09+00:00",
        "UpdateDate": "2022-11-11T14:01:09+00:00"
    }
}
Run the following command to attach the policy to your execution role. Replace the values for --role-name with the name of the execution role, and --policy-arn with the ARN of the policy created in the previous step.
aws iam attach-role-policy --policy-arn <your-policy-arn> --role-name FISSchedulerRoleThe attach-role-policy operation does not return a response.
Creating a recurrent schedule
Now let’s create a recurrent schedule that runs every 10 minutes. To do that, we will run the following command:
aws scheduler create-schedule --name fis-scheduled-experiment \
--schedule-expression 'rate(10 minutes)' \
--flexible-time-window '{ "Mode": "OFF"}' \
--target '{"RoleArn": "arn:aws:iam::<your-aws-account-id>:role/FISScheduler", "Arn":"arn:aws:scheduler:::aws-sdk:fis:startExperiment", "Input": "{\"ClientToken\": \"<aws.scheduler.execution-id>\", \"ExperimentTemplateId\": \"<your-experiment-template-id>\" }" }'
But before executing that command, let’s take a look at the different parts.
The first parameter, the name of the schedule, is self-explanatory.
The schedule expression attribute defines if the event is a one-time schedule or a recurrent schedule. Recurrent schedules can be configured with a cron expression or a rate expression —in this example rate(10 minutes).
The parameter flexible time window is used to configure a time window during which EventBridge Scheduler invokes the schedule.
Finally, the target. For this example, we use the universal target, which allows you to invoke almost any AWS services. The target itself is defined as follows:
RoleArn — The ARN for the execution role you want to use for the target. The execution role you specify must have the permissions to call the API operation you want your schedule to target.
Arn — The complete service ARN, including the API operation you want to target, in the following format: arn:aws:scheduler:::aws-sdk:service:apiAction. For example, for AWS FIS, the service name you specify is arn:aws:scheduler:::aws-sdk:fis:startExperiment.
Input — A well-formed JSON to serve as the request body that EventBridge Scheduler sends to the target. You must create this JSON according to the set of parameters that a target’s API requires.
For the FIS Start-Experiment API, the mandatory fields are defined as:
{
  "ClientToken ": "<aws.scheduler.execution-id>",
  "ExperimentTemplateId": "<your-experiment-template-id>"
}experimentTemplateId: The ID of the experiment template. You will need to replace that one with your own.
clientToken: A unique identifier that you provide to ensure the idempotency of the request. Idempotency ensures that the results from an operation are the same, even if the operation is executed multiple times. EventBridge Scheduler lets you use special keywords in the target payload, for example <aws.scheduler.execution-id>, that you can use as the unique ID that EventBridge Scheduler assigns for each invocation of a target. Since it is a special keyword, do not replace <aws.scheduler.execution-id> in the command.
Now, run the create-schedule command.
aws scheduler create-schedule --name fis-scheduled-experiment \
--schedule-expression 'rate(10 minutes)' \
--flexible-time-window '{ "Mode": "OFF"}' \
--target '{"RoleArn": "arn:aws:iam::<your-aws-account-id>:role/FISScheduler", "Arn":"arn:aws:scheduler:::aws-sdk:fis:startExperiment", "Input": "{\"ClientToken\": \"<aws.scheduler.execution-id>\", \"ExperimentTemplateId\": \"<your-experiment-template-id>\" }" }'
If the create-schedule operation is successful, you’ll see the following output.
{
    "ScheduleArn": "arn:aws:scheduler:us-east-1:<your-aws-account-id>:schedule/default/fis-scheduled-experiment"
}
That’s it!
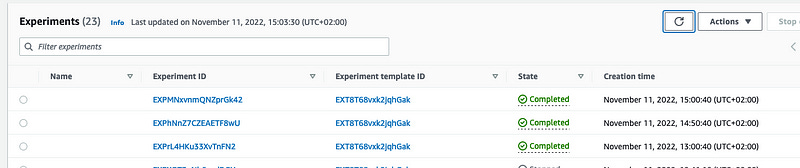
Your experiment should be executing every 10min. You can verify it by logging in the FIS Console, and listing Experiments.
You can also verify the events with CloudTrail, by filtering the attribute Event Names with StartExperiment.

with StartExperimentDisable the Scheduler
An EventBridge schedule has two states: enabled and disabled. Thus, if you want to pause the execution of a schedule, you need to update the EventBridge Scheduler by modifying its state. You need to use the UpdateSchedule operation for that. However, you must provide all required parameters. If you do not specify a parameter that you've previously set, it defaults to null.
aws scheduler update-schedule --name fis-scheduled-experiment \
--schedule-expression 'rate(10 minutes)' \
--flexible-time-window '{ "Mode": "OFF"}' \
--target '{"RoleArn": "arn:aws:iam::01234567890:role/FISScheduler", "Arn":"arn:aws:scheduler:::aws-sdk:fis:startExperiment", "Input": "{\"ClientToken\": \"<aws.scheduler.execution-id>\", \"ExperimentTemplateId\": \"your-experiment-id\" }" }' \
--state DISABLED
You can also delete a schedule using the following command:
aws scheduler delete-schedule --name fis-scheduled-experimentThat’s all, folks. I hope you enjoyed this post. Please don’t hesitate to share your feedback and opinions.
Adrian
—
Subscribe to my stories here.
Join Medium for $5 — Access all of Medium + support me & others!