Multi-region serverless backend — reloaded
Accelerating Serverless Applications with Global Accelerator
Accelerating Serverless Applications with Global Accelerator and Application Load Balancer
In 2018, I wrote a series of blog posts on building a multi-region, active-active, serverless architecture on AWS [1, 2, 3 and 4]. The solution was built using DynamoDB Global Tables, Lambda, the regional API Gateway feature, and Route 53 routing policies. It worked well as a resiliency pattern and as a disaster recovery (DR) strategy . But there was an issue.
Brace yourself: DNS isn’t perfect
DNS is one of the most important services on the Internet as it turns a user-friendly domain name like amazon.com into an IP address that computers use to identify each other and direct traffic to a network.
To do so, the DNS service uses a hierarchy of name servers distributed around the world that try to answer a simple question: “what is the IP for that particular domain name?” If a name server cannot answer the question, it may query another name server higher in the hierarchy. This process is called recursive query.
Now imagine if every time you typed a domain name on your browser or every time you used an app on your phone, the DNS service had to repeat the entire process from scratch and query all the name servers in the recursion chain. This would be slow, resource-intensive and prone to failure.
Caching to the rescue
Luckily, the designers of the DNS service thought about that and specified the use of a time-to-live (TTL) for every DNS record. Caching name servers use that TTL configuration to determine how long the result of a particular DNS query should be stored. DNS caching improves the efficiency of the DNS service as it reduces the DNS traffic across the Internet, but also serves as a resiliency technique because it prevents overloads of the authoritative name-servers, particularly the root name-servers which sit at the top of the hierarchy.
Because they can speed up resolution of the query, DNS caching servers increase the performance of end-user applications.
To further increase performance, many end user applications (like web browsers) save the result of DNS lookup in their local cache. See below with Firefox.
Setting up TTLs for your domain name isn’t difficult. However, knowing what value to set requires careful thinking. Long TTLs help reduce traffic on the Internet and prevent domain name servers from overloading, while short TTLs often cause heavy loads on authoritative name servers but are useful for speeding up DR strategies.
However, a persistent problem is that caching name servers and some client devices often set their own TTLs regardless of the value set in the DNS record. Therefore, it cannot be guaranteed that DNS lookups will return the correct values, even after the TTL has expired.
This is a big problem for DR strategies, as in case of failure, you can’t be sure how long it will take for client devices to have an updated and accurate version of IP addresses returned from a DNS lookup.
But that’s not all. Many device clients and caching name servers don’t implement caching properly. While stale cached content needs to eventually expire and be evicted from the cache, it should be served when the origin server is unavailable, even if the TTL is expired, providing resiliency and high availability at times of peak load or failure of the origin server.
Until reInvent 2018, there wasn’t much we could do about it!
Introducing Global Accelerator
Global Accelerator (GA) is a networking service that improves the availability and performance of global applications without relying on DNS services and caching name servers. Instead, GA uses static IP addresses as a single, fixed entry point for users connecting to applications.
Since GA does not rely on IP address caches, when you need to make changes to your networking configuration, e.g. in case of failure or if you want to do blue/green deployment, propagation of the changes takes just seconds, reducing potential downtime or delay for your users.
And better yet, can do all that without having to update any DNS configurations or make changes to client-facing applications. In addition, because you can provide static IP addresses for corporate proxies, your company’s IT can whitelist your application’s static IP addresses in its firewalls. Yes, this is still common practice, even in 2019 :-)
So, how does it work?
To enable fault tolerance, GA provides you with multiple static IP addresses that are serviced by independent network zones. Similar to Availability Zones, these network zones are isolated units with their own set of physical infrastructures and service IP addresses from a unique IP subnet. If one IP address from a network zone becomes unavailable, client applications can retry on the healthy static IP address from the other isolated network zone.
These static IP addresses are provided using Border Gateway Protocol (BGP) anycast, meaning that from a single destination address, they will distribute incoming traffic across multiple endpoints e.g. between two or more AZs or Regions, which further increases the availability of applications. These endpoints can be Elastic IP addresses, Network Load Balancers, or Application Load Balancers.
GA uses a consistent-flow hashing algorithm to choose the optimal endpoint for a user’s connection. If you don’t configure client affinity for your GA, it will use the five Tuple Properties — source IP, source port, destination IP, destination port, and protocol — to select the hash value, and then choose the endpoint that will provide the best performance.
You can also maintain client affinity by routing a specific user — identified by their source IP address — to the same endpoint each time they connect. Client affinity is especially useful if you have stateful applications.
Back to our multi-region serverless architecture
Another important release from reInvent 2018 is the Application Load Balancers (ALB) support for Lambda functions.
Prior to this launch, you could only use EC2 instances, containers, and on-premises servers, as targets for ALBs, and you needed other proxy solutions to invoke Lambda functions over HTTP(S). However, you can now use an ALB as a common HTTP endpoint for serverless applications powered by Lambda functions. With the ALBs’ support for content-based routing rules, you can route requests to different Lambda functions based on the request content.
Solution Overview
The solution presented here leverages the same database as the 2018 series DynamoDB Global Table which provides a fully-managed, multi-region, multi-master database. Since I wrote extensively about Global Tables here and here, I won’t go into detail in this post.
For the rest, it leverages AWS Lambda for business logic and the ALB for the HTTP(S) endpoint. Finally, it uses the Global Accelerator to dynamically route traffic between two AWS regions. In my example, I’ll use us-west-2 and eu-central-1.
Let’s get started!
#1 Creating a Global Table
When you create a DynamoDB table, in addition to the table name, you must specify the primary key of the table. The primary key uniquely identifies each item in the table so that no two items have the same key. In a global table, every replica table shares the same table name and the same primary key. Because a global table is a multi-master database, applications can write data to any of the replica tables. DynamoDB automatically propagates these writes to the other replica tables in the AWS Regions you choose.
To create a global table, open the DynamoDB console and create a table with a primary key. The primary key can be simple (a partition key only) or composite (a partition key combined with a sort key).
In the console, create a table called GlobalApp with item_id as the primary key, then choose Create. This table will serve as the first replica table in the global table.
To create the global table, do the following:
Navigate to the Global Tables tab.
Choose Enable streams.
Global tables use DynamoDB Streams to propagate changes between replicas. A DynamoDB stream is an ordered flow of information about changes to items in a DynamoDB table. Whenever an application creates, updates, or deletes items in a table, streams writes a stream record with the primary key attributes of the items that were modified.
Note: You might see a pop-up that mentions the type of the stream being used: New and old images. This simply means that both the new and old images of the item in the table will be written to the stream whenever data in the table is modified. This stream is used to replicate the data across regions. Click Enable.
After you enable streams, choose Add region to add new regions to your global table (see the following screenshot). Choose the AWS Regions where you want to deploy replica tables and then choose Continue.
In my demo, I chose the EU (Frankfurt) region :eu-central-1
Adding regions starts the table creation process in the regions you chose. After a few seconds, you should be able to see different regions forming in your global table.
Finally, let’s add foobar to the global table.
#2: Creating the Lambda function
For demo purposes, I’ll create a simple function that gets an item from the DynamoDB global table created previously, and returns a health check. For the sake of simplicity and clarity, I’ll include both functions in one file called get.py.
Building the ZIP package for the Lambda function
Regardless if you’re using Linux, Mac or Windows, a simple way to create your ZIP package for Lambda is to use Docker because AWS Lambda needs Linux-compatible versions of libraries to execute properly.
With Docker you can easily run a Linux container locally on your Mac, Windows or Linux computer; install Python libraries within the container so they’re automatically in the right Linux format; and ZIP the files ready to upload to AWS. You’ll need to install Docker first. (https://www.docker.com/products/docker).
Once you’ve installed Docker, you can do the following:
1 — Download and save the Gist get.py.
2 — Create and save a file called requirements.txt in the same directory and add the following line
simplejson==3.16.0You should have the following directory structure:
2 — Spin-up a docker-lambda container, and install the Python requirements in a directory called vendor. You can do so with this one-liner:
$ docker run -v $PWD:/var/task -it lambci/lambda:build-python3.6 /bin/bash -c "pip install -r requirements.txt -t vendor"Your directory structure should now look like this, with vendor folder filled with the simplejson dependencies:
3 — Package your code by running the following command:
$ zip -r function.zip .Voila! Your package function.zip is ready to be used in Lambda.
Uploading the Lambda function
Log into the AWS Lambda Console and create a Python 3.7 compatible function from scratch and upload the ZIP package. Make sure the handler is get.get_item
Add the environment variables tablename and STATUS with the values GlobalApp and 200 respectively.
Configure a test event as follows.
You can now test the lambda function. The output should look something like the following , returning the foobar item from DynamoDB:
Repeat the same procedure for deploying a similar lambda function in the other Region.
Note: Don’t forget to give the proper permissions to Lambda to access the DynamoDB table.
3#: Adding the Application Load Balancer
Log into the EC2 AWS console and create a new load balancer. Select the Application Load Balancer type. Click Create.
Give it a name, e.g. GlobalApp, leave the default HTTP protocol and port 80 (for serious applications, please use HTTPS). Select the default VPC or create a new one.
Configure the security group to allow HTTP traffic to reach the load balancer.
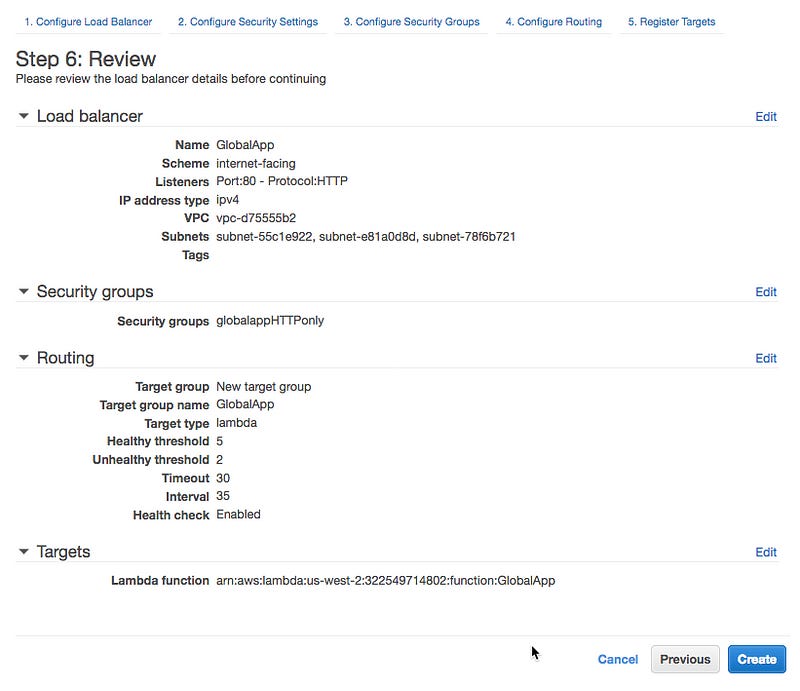
Then configure the routing. This is where you define the target Lambda function. Give your target a name, e.g. GlobalApp, select Lambda function as target type. Select the HTTP protocol on port 80. Setup the health check with HTTP protocol on the Path /health.
Notice the Advanced health check settings? It’s important you understand what they mean.
Healthy threshold is the number of consecutive health checks successes required before considering an unhealthy target healthy.
Unhealthy threshold is the number of consecutive health check failures required before considering a target unhealthy.
Timeout is the amount of time, in seconds, during which no response means a failed health check.
Interval is the approximate amount of time between health checks of an individual target.
Each of these values plays an important part in a failover scenario. In the above case, the target will be considered unhealthy after two unsuccessful checks (code error different than 200) separated by intervals of approximately 35 seconds.
Finally, register the lambda function as a target for the load balancer by selecting the GlobalApp lambda function on the drop-down list.
Review and click Create.
After a while, you should see the active ALB in the console list.
In the description tab, you’ll find a DNS name field. You can use it to test your new ALB and its integration with Lambda. Let’s try!
Niiice — our ALB to Lambda integration works! Both /get/foobar and /health APIs return successfully.
Now, repeat the same procedure for deploying a similar ALB in the other AWS Region of your choice.
3#: Creating the Global Accelerator
Log into the GA console and create a new accelerator.
Give it a name, e.g. GlobalApp.
Configure the listener to use the port 80, protocol TCP with no client affinity (more on that later).
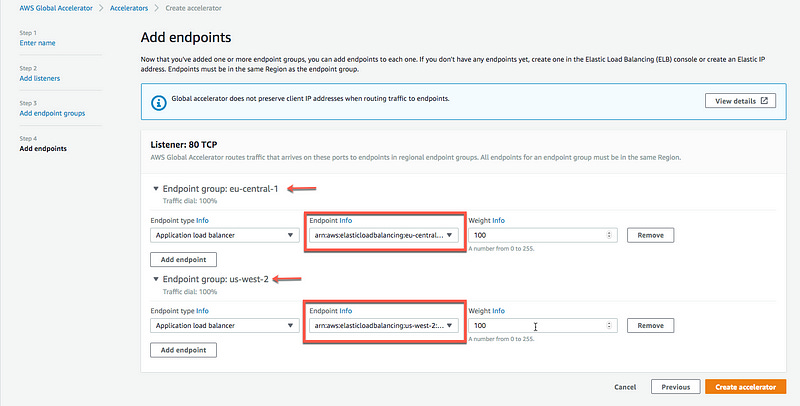
Add endpoint groups for each of the regions where we’ve deployed the ALB. In my demo, I used eu-central-1 and us-west-2.
Finally, add the endpoints for each region. The endpoints are the ARNs of the ALBs.
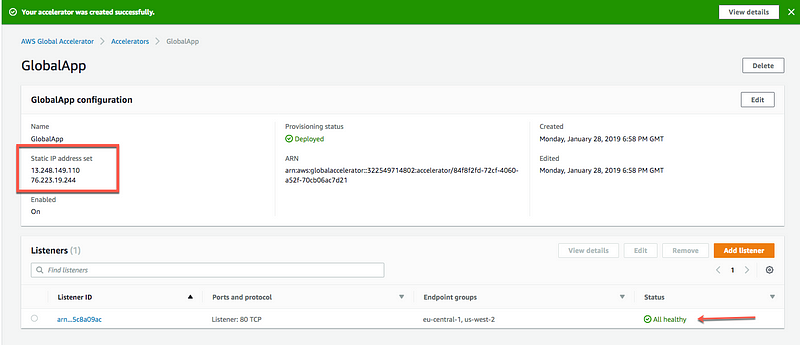
After a few seconds, your GA is available and you can see the assigned static IP addresses set for your accelerator (13.248.149.110 and 76.223.19.244).
Since we’ve configured the ALB with a health check, the GA is able to report that each of the endpoints are healthy.
GA automatically checks the health of the endpoints that are associated with your static IP addresses and then directs user traffic only to healthy endpoints. To learn more about how Global Accelerator uses health checks, click here.
4#: Testing the Global Accelerator
Let’s quickly test the newly-deployed accelerator. Notice that we get the same result from both static IP addresses: 13.248.149.110 and 76.223.19.244 .
So far, so good!!
5#: Let’s try that Global Accelerator!
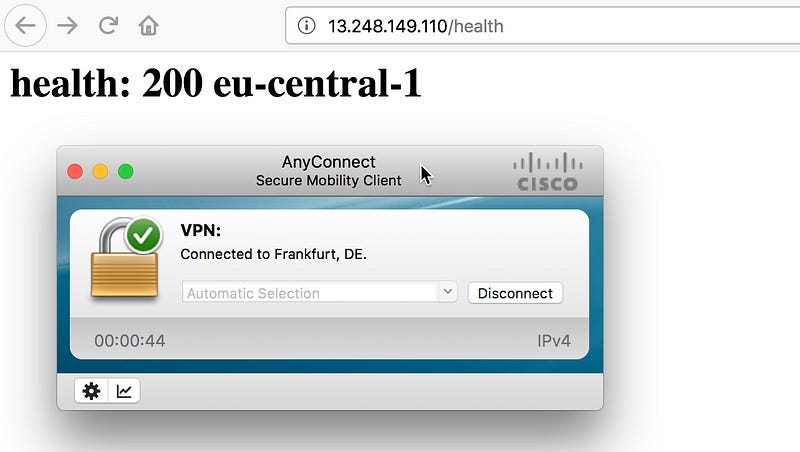
First, let’s do a simple API call to see if the GA does indeed connect me to the closest endpoint. To simulate my geographic location, I’ll use a VPN connection setup to connect to a server in Europe (Frankfurt).
As you can see, the GA does indeed route me to the backend deployed in the eu-central-1 region. Easy, I give you that :)
Now, let’s connect to a VPN server in Sao Paulo, Brazil.
A quick refresh, and the route is updated to connect to the backend endpoint in us-west-2 which is indeed much closer than the backend in Frankfurt.
6# Now let’s break things and test the failover!
Before doing any chaos, lets modify some of the settings to optimize a speedy failover.
Log into the EC2 load balancer console and modify the heath check configuration with the following value: Healthy threshold (2), Unhealthy threshold (2), Timeout (10 seconds) and Interval (15 seconds). This should give us approximately 30 seconds for GA to detect the unhealthy endpoint (2 failing health checks every 15 seconds = 30 sec in total).
Understanding the failover timing
According to the FAQs, GA can detect an unhealthy endpoint and take it out of service in less than one minute.
This makes sense, as under the hood, GA needs to ingest the ALB health checks and propagate these updated health information to all the Point-of-Presences (PoP) at the edge of the network so that every PoP knows not to send traffic to that unhealthy endpoint.
So, with the unhealthy health check detection (~30s) and the GA routing state propagation (~1 minute), the overall failover time should be around 1 minute 30 seconds. We will verify this soon.
Let’s continue with the setup.
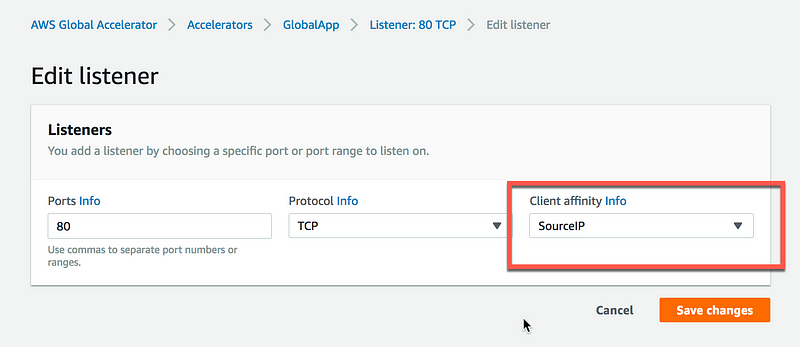
Now log into the Global Accelerator and edit the Listener configuration by enabling Client affinity to support SourceIP. Client affinity with direct all requests from a user at a specific address to the same endpoint resource in order to maintain client affinity. This is useful for stateful applications, and also for testing failover and recovery.
Let’s make an API call to check which backend is currently active. My current connection is to us-west-2.
Log into the Lambda console in us-west-2 and modify the value of the environment variable STATUS to 400 (instead of 200). This will trigger the unhealthy check process.
After approximately one minute, the failover has appended as expected, and the routing is updated to direct the traffic to the eu-central-1 backend.
Now let’s try to recover. Since we’ve enabled client affinity, the us-west-2 backend should be back as the default backend. Reset the STATUS environment variable of the lambda function in us-west-2 to 200. This will bring back the backend in a healthy state and — hopefully — enable recovery.
After approximately one minute, again as expected, the routing is recovered to its original state — with the us-west-2 Region as the origin endpoint.
Voilà, everything is working according to the specs!!
6# Final points: Global Accelerator versus Route 53
One question remains: When should you use Global Accelerator, and when should you use Route 53 with latency-based routing for a multi-region backend setup?
Great question — glad you asked it!
Route 53 latency based-routing uses network latency and DNS telemetry to choose the best record set to return for any given query, and therefore selects the best AWS region to send your requests to. These requests will enter the AWS backbone closest to the target backend, thus spending more time on the ISP’s networks and the Internet.
On the other hand, with GA, the same request will enter the AWS backbone closet to the end-user, at the edge of the network, thus spending more time on the reliable AWS backbone.
This means that if you’re running a multi-region setup, you have to consider the distance between the users and the target backends, as well as the number of regions in which the backend is deployed. If you serve your application from a small number of regions, GA will improve the performance of the application since the average time a packet will spend on the AWS backbone will increase. If you serve your application from many AWS Regions, using Route 53 is probably the right thing to do , particularly since you have more flexibility with Route 53 routing policies.
One thing that I didn’t test or address in this post is that GA lets you set weights for your regional endpoint groups. For each endpoint group, you can set a traffic dial to control the percentage of traffic that is directed to the group. The traffic dial lets you easily do performance testing or blue/green deployment testing for new releases across different AWS Regions, for example.
Finally, whitelisting IP addresses in firewalls is a lot easier than whitelisting domain names, so for this reason, many customers will choose GA.
Wrapping up.
That’s all for now, folks. Thanks for reading this lengthy blog post — hopefully it’s inspired you to start experimenting with the new GA and the ALB to Lambda integration. Let me know what you think: share your opinions, or simply clap your hands :)
Adrian
—
Subscribe to my stories here.
Join Medium for $5 — Access all of Medium + support me & others!


