Injecting custom faults with AWS Fault Injection Simulator
Part 2— AWS Fault Injection Simulator series
Part 2— AWS Fault Injection Simulator series
TL;DR
You can use AWS Lambda and embedded scripts to inject custom faults with AWS Fault Injection Simulator (FIS) using the newly launched SSM Automation & FIS integration.
GitHub - adhorn/aws-fis-templates-cdk: Collection of AWS Fault Injection Simulator (FIS) experiment…
These templates let you perform fault injection experiments on resources (applications, network, and infrastructure) in…github.com
Many customers I have talked to since AWS Fault Injection Simulator (FIS) launched in early 2021 have some home-made scripts they use to inject fault into their applications. Rather than re-factoring all these scripts into native FIS experiments, they typically want to start their FIS journey by forklifting them, with minimal changes, to benefits from the safety mechanisms FIS provides and have one central place from which to control their chaos engineering experiments.
Back in 2019, I wrote a bunch of home-made fault injection scripts, so I thought I would use this opportunity to show you how I integrated them into FIS — in particular this one popular with customers, used to inject fault in the network access control list configuration of a particular Availability Zone (AZ) and VPC.
In this blog post, I will walk you through and describe in details how you can use (1) embedded scripts and (2) AWS Lambda to inject custom faults with FIS using the newly launched FIS & SSM Automation integration.
Fun Fact: This FIS & SSM Automation integration is also used by AWS ResilienceHub to test and verify if applications meet their resilience target.
What is SSM Automation and how it integrates with AWS FIS?
SSM Automation (SSMA) was initially launched to simplify frequent maintenance and deployment tasks of AWS resources and, especially, codify them. SSMA gives a broad set of controls and capabilities to inject faults into AWS resources; e.g., SSMA can execute commands and scripts, invoke Lambda functions, and execute custom Python or Powershell scripts. SSMA also has safety features such as cancellation and failure handling, and even support human approval steps.
While SSMA supports a wide variety of actions, the important ones for this blog post are:
aws:executeScript — Run Python or PowerShell scriptsaws:invokeLambdaFunction — Invoke AWS Lambda functionsaws:sleep — Delay an SSM Automation execution
To execute these actions, SSMA uses documents (also called runbooks), defined in YAML or JSON, that can be triggered directly via the AWS console, the CLI, and the SDKs.
However, with the recent FIS-SSMA integration, you can now trigger them through an FIS experiment using the new aws:ssm:start-automation-execution action.
Following is an example FIS experiment using this new aws:ssm:start-automation-execution action (line 5).
aws:ssm:start-automation-execution actionBy configuring SSMA documents to be triggered by FIS experiments, you inherit the FIS safety features such as the stop-conditions defined line 14 in the experiment above. You can also take advantage of running FIS actions in parallel with one another and of course, combining SSMA with other native FIS actions.
A stop-condition is a mechanism to stop an experiment if it reaches a threshold that you define as a CloudWatch alarm. If a stop condition is triggered during an experiment, FIS stops the experiment and cancels the execution of the SSMA documents, which, if enabled, can rollback the experiment to the state prior to the fault injection.
For this blog post, we will create two different SSMA documents — one which uses the aws:executeScript to run inline Python scripts and one which uses the aws:invokeLambdaFunction to invoke two different Lambda functions.
Both will be used to inject faults in the networking configuration of a particular AZ and VPC. The scripts modifies the networking access control list configuration of a particular AZ by denying ALL traffic flow within its associated subnet(s).
We inject such a fault to verify an application’s statelessness capability and also to verify if our system detects and eventually remediates such a networking failure. However, this validation is outside the scope of this blog post.
After the fault duration, the script rolls back the initial configuration of the network access control list.
Understanding SSMA documents
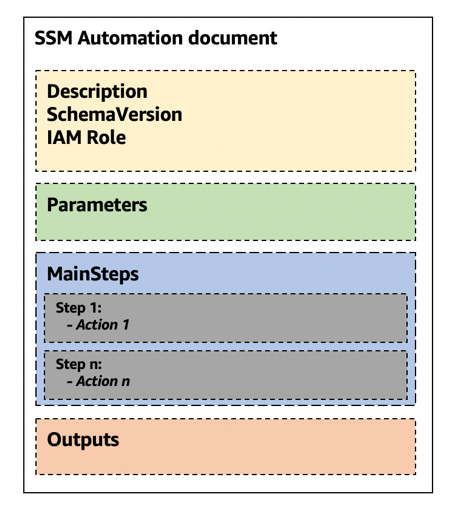
From an high level view, an SSMA document comprises four main sections.
The top section of SSMA documents starts with a description, the schemaVersion, and assumeRole, which is the IAM role that SSMA needs to assume to run the actions defined below in the MainSteps below.
The Parameters section are parameters operators need to input for each experiment’s execution.
The MainSteps section defines actions that SSMA performs on AWS resources. Each of these steps defines a single action type.
It is important to understand that the output from one step can be used as input in the following step by using the JSONPath output operator. We will use this feature to save the rollback configuration.
Typically, actions defined in the MainSteps return a JSON response. Some can be filtered using a JSONPath expression beginning with $.. The following JSONPath operators are supported by SSMA:
Dot-notated child (.): This operator selects the value of a specific key.
Deep-scan (..): This operator scans the JSON element level by level and selects a list of values with the specific key. The return type of this operator is always a JSON array. In the context of an automation action output type, the operator can be either StringList or MapList.
Array-Index ([ ]): This operator gets the value of a specific index.
For example, to get a specific String from the JSON response of the EC2 DescribeInstances API operation, you can use the following expression:
JSONPath: $.Reservations[0].Instances[0].ImageId
Type: String
Returns:
"ami-12345678"To get a MapList from the same JSON response, you can use the following:
JSONPath: $.Reservations..Instances..State
Type: MapList
Returns:
[
{
"Code" : 16,
"Name" : "running"
},
{
"Code" : 80,
"Name" : "stopped"
}
]For more information and examples on other supported output types, click here.
Two important features of SSMA documents relevant for our use-case are the onFailure and onCancel signals. The onFailure signal indicates whether the ongoing automation should stop, continue, or go to a different step on failure. The onCancel signal, on the other hand, indicates which step the ongoing automation should go to if an experiment get canceled. It is important to note that the automation workflow runs the cancellation steps for a maximum of two minutes. The onCancel signal will be triggered by FIS if an experiment reaches a threshold that you define as a CloudWatch alarm, in which the execution of the SSMA documents is canceled.
Since we want to leverage the onCancel signal, we must separate the fault injection from the rollback mechanism and include a specific sleep action which can be canceled and redirect to the rollback step.
Note: We will also include an opportunistic onCancel and onFailure in the fault injection part. But since the injection step output is used to feed the rollback, there is little chance that it would ever be useful. But since it does not do any harm, lets be opportunistic.We could, of course, redirect the automation execution to a separate step altogether in case of failure.
Fault injection and rollback mechanism
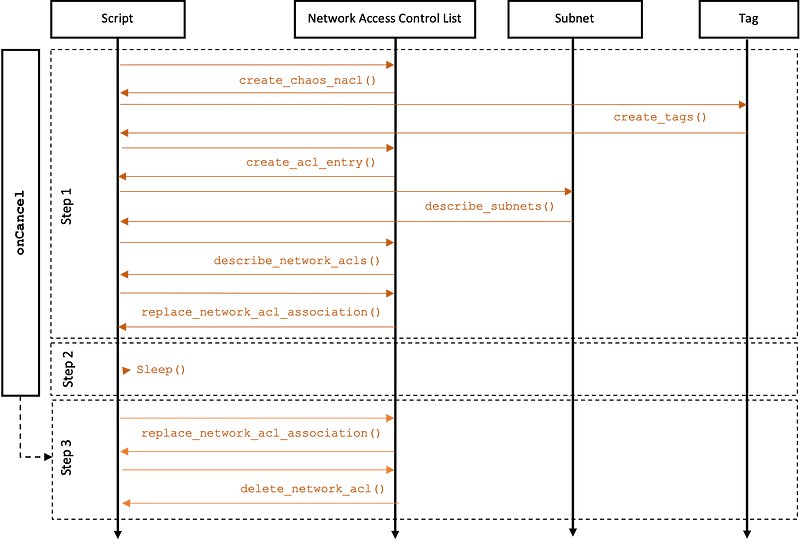
Now that we understand how the action’s input/output and the onCancel signal work, we can define the MainStep structure of both SSMA documents:
Step 1
Inject the fault by associating a custom “chaos” NACL to all subnets belonging to a particular AZ (outputs the initial NACL association)
Step 2
Sleep (duration specified in the input parameter)
Step 3
Rollback the fault by restoring the initial NACL association and deletes the custom “chaos” NACL.
Here is a more detailed functional diagram of the fault logic:
The main difference between the SSMA document using the aws:executeScript and the aws:invokeLambdaFunction will be that Step 1 and 3 are either embedded scripts or scripts executed by Lambda functions.
Let’s start with the first version of the SSMA document using theaws:executeScript action.
(1) Embedding Python scripts directly within SSMA
Let’s look at the SSMA aws:executeScript action which executes the Python scripts.
action: "aws:executeScript"
inputs:
 Runtime: "python3.6"
 Handler: "script_handler"
 InputPayload:
  "parameter1": "parameter_value1"
  "parameter2": "parameter_value2"
 Script: >
   def script_handler(events, context):
   (script commands)
outputs:
  Payload
Action parameters are defined as follows:
Runtime: The runtime language to be used for executing the provided script. Supported values are python3.6 | python3.7 | python3.8 | PowerShell Core 6.0 | PowerShell 7.0
Handler: The entry for running the script, usually a function name. You must ensure the function defined in the handler has two parameters, events and context.
InputPayload: A JSON or YAML object that will be passed to the first parameter of the handler. This is used to pass input data to the script.
Script: An embedded script that you want to run during the automation. It is worth noting that this is not supported for JSON runbooks.
Note: if you plan to continuously work on your scripts, you may attach the scripts instead of embedding them. Doing so will greatly simplify unit testing.
Output: The JSON representation of the object returned by your function. Up to 100KB is returned. Accessed using the keyword Payload.
(2) Invoke Lambda Function via SSMA
Let’s now take a look at using Lambda function to inject the custom fault.
First, let’s create the Lambda functions for the (1) fault injection and the (2) rollback.
(1) Fault injection Lambda function
You might be wondering why that Lambda function returns a json.dumps() object. That’s simply because the input Payload of the rollback Lambda function must be an escaped JSON String.
(2) Rollback Lambda function
The rolling back lambda function naturally uses json.loads() to convert the previously escaped JSON String into a Python dictionary:
Deploy these two Lambda functions using the technology of your choice (outside the scope of this blog). You can then use the function names as input for the SSMA document below.
Let’s look at the SSMA aws:invokeLambdaFunction action to invoke a Lambda function. That action is defined as follows:
name: invokeMyLambdaFunction
action: aws:invokeLambdaFunction
maxAttempts: 3
timeoutSeconds: 120
onFailure: Abort
inputs:
  FunctionName: MyLambdaFunction
  Payload: JSON
outputs:
  Payload: JSON
  StatusCode
With the following parameters:
FunctionName: The name of the Lambda function. This function must exist.
(Input) Payload: The JSON input for your Lambda function.
(Output) Payload: The JSON representation of the object returned by the Lambda function.
StatusCode: The HTTP status code.
Note: Each aws:invokeLambdaFunction action can run up to a maximum duration of 300 seconds (5 minutes).
Nuff said — Let’s demo this!
For this example, I will need the proper FIS IAM roles as described here.
FIS permission summary:
ssm:GetAutomationExecution
ssm:StartAutomationExecution
ssm:StopAutomationExecution
iam:PassRole (if the automation assumes a role)
You also need another IAM Role for SSMA and the Lambda function (for the Lambda version) to perform actions defined in the document as described here.
SSMA & Lambda function permission summary:
ec2:CreateNetworkAcl
ec2:CreateNetworkAclEntry
ec2:CreateTags
ec2:DescribeSubnets
ec2:DescribeNetworkAcls
ec2:ReplaceNetworkAclAssociation
ec2:DeleteNetworkAcl
For this demo, I will use the embedded script version of the fault injection. However, the effect is exactly the same as the Lambda function version.
Here is a view in the VPC Console, the Subnets and their NACL association before injecting the fault. All clear!
Let’s start by creating the FIS experiment template.
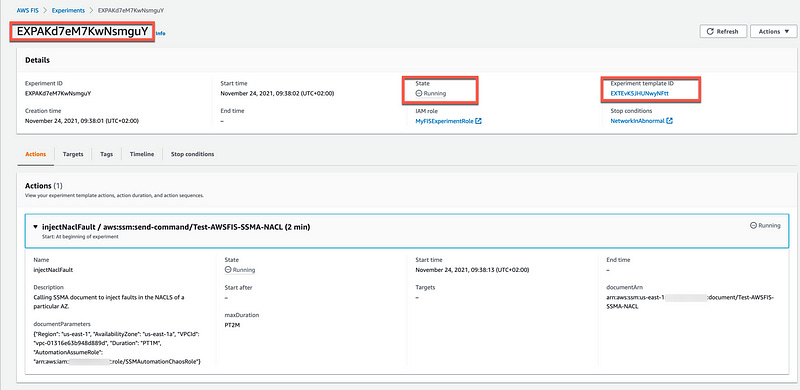
We can now start the FIS experiment with the template ID returned by the create-experiment-template request above, in my case EXTEvK5JHUNwyNFtt .
If you open the FIS Console and click on the experiment ID, in my case EXPAKd7eM7KwNsmguY, you can see the details of the experiment and its status, currently in running state.
Going back to the VPC console, we can see the Subnets and their NACL association has changed. They are now associated with a new NACL called chaos-nacl. This is the fault injection in action.
Let’s stop the FIS experiment and verify that the onCancel signal works has expected.
Going back to the VPC console, we can see the Subnets and their NACL association has reverted back to the initial association as it was before the fault injection. The fault injection has been successfully canceled and rolled back.
That’s all, folks. Thanks for reading this far. I hope you’ve enjoyed this post. Please don’t hesitate to give feedback, share your opinion, or clap your hands :-)
Adrian
—
Subscribe to my stories here.
Join Medium for $5 — Access all of Medium + support me & others!


