Injecting Chaos to AWS Lambda functions using Lambda Layers
“As far as the laws of mathematics refer to reality, they are not certain, and as far as they are certain, they do not refer to reality.”…
“As far as the laws of mathematics refer to reality, they are not certain, and as far as they are certain, they do not refer to reality.” -Albert Einstein
UPDATE — October 2019
The code used for this blog post has evolved a bit and became that and that. However, the principles explained here remains similar. Just be aware :-)
In my previous post, I explained how to get started with AWS Lambda Layers in Python. In this post, I’ll show you how to deploy a small chaos engineering experiment using Lambda Layers to conduct latency injection attacks to Lambda functions.
Note 1: Some of the ideas in this blog post have been inspired by the excellent post from Yan Cui — Applying principles of chaos engineering to AWS Lambda with latency injection.
Note 2: I would also like to give a massive thank you to my wonderful colleague and friend Heitor Lessa, a.k.a ServerLessa, for helping me improve this post.
Why latency injection?
Latency is the time a data packet takes to travel back and forth between entities, and it’s no secret that latency is a silent killer in many distributed applications, responsible for many of the failures — some of them catastrophic — that I’ve experienced in the past.
Often hiding behind latency are configuration mistakes, wrong default timeouts values, load-balancing or host overload, dependency problems, or intermittent network issues. To repeat the quote from Werner Vogels:
“Failures are a given, and everything will eventually fail over time.”
Therefore, you must test and continuously improve your application’s resilience to latency in order to minimize its impact on your user’s experience, and chaos engineering experiments, like latency injection, are one of the best ways to do that.
Before we get started
As I explained in my previous blog post on getting started with AWS Lambda Layers, a Layer is a ZIP archive that contains libraries and other dependencies that you can import at runtime for your lambda functions to use. It is especially useful if you have several AWS Lambda functions that use the same set of functions or libraries, promoting code reuse! This re-usability makes Lambda Layers ideal for running small chaos experiments.
For my little chaos experiment, I will use — just as Yan Cui did, SSM to store the following JSON configuration object as a string. The values are self-explanatory — delay is in milliseconds.
{
   "delay": 300,
   "isEnabled": true
}
Open the AWS EC2 Console, select Parameter Store, and store the above configuration in an SSM parameter called chaoslambda.config.
SSM provides a secure way to store configuration variables for your applications, serverless or not, and can be accessed using the AWS Console, the AWS CLI, or even better — AWS SDKs. To get that configuration from an AWS Lambda function is simple. Leveraging the excellent library ssm-cache-python from my colleague Alex Casalboni, you can use the following two lines of code to retrieve a configuration stored in SSM:
from ssm_cache import SSMParameter
param = SSMParameter('chaoslambda.config')
For my little experiment, I will use the following get_config() function which applies some logic to the value of delay (again self-explanatory).
def get_config():
    param = SSMParameter('chaoslambda.config')
    try:
        value = json.loads(param.value)
        delay = value["delay"]
        isEnabled = value["isEnabled"]
        if isEnabled and delay >= 0:
            return delay
        elif isEnabled and delay <= 0:
            return -1
        else:
            return 0
    except InvalidParameterError as e:
        print("{} is not SSM".format(e))
        return 0
    except KeyError as e:
        print("{} is not a valid Key in SSM configuration".format(e))
        return 0
To allow the AWS Lambda function to access SSM, you have to give it correct IAM permissions (more details here):
{
    "Version": "2012-10-17",
    "Statement": [
        {
            "Effect": "Allow",
            "Action": [
                "ssm:DescribeParameters"
            ],
            "Resource": "*"
        },
        {
            "Effect": "Allow",
            "Action": [
                "ssm:GetParameters",
                "ssm:GetParameter"
            ],
            "Resource": "arn:aws:ssm:eu-north-1:<ACCOUNT_ID>:parameter/chaoslambda.config"
        }
    ]
}
You might wonder why I use SSM over Environment variables. It’s a fair question.
Environment variables in Lambda allow you to dynamically pass settings to Lambda functions without making changes to the code itself, especially settings that are not often changed (like databases). Lambda then makes these variables available to your Lambda function using standard APIs supported by the language, like os.environ for Python. The following code snippet shows how you would abstract a DynamoDB table and an AWS Region in your lambda function using environment variable:
import os
region = os.environ["AWS_REGION"]
tablename = os.environ["tablename"]
dynamodb = boto3.resource('dynamodb', region_name=region)
table = dynamodb.Table(tablename)By separating environment settings from application logic, you don’t need to update and redeploy function code if you need to change the name of the database or the region where you execute that function — you know, abstractions :-)
One problem with environment variables is their locality. Sharing them across a wide number of Lambda functions will become cumbersome, but most problematic for me is that configurations stored in environment variables in Lambda aren’t shareable with AWS compute services like EC2 or ECS.
Note: for a complete list of SSM features, check here. For SSM limits, please check here.
Latency injections using Python.
Back to my small chaos experiment. They are two simple ways to inject latency into Lambda functions in Python: (1) Using a decorator pattern and (2) by subclassing the requests library.
1 — Using a Python decorator
A decorator is a software design pattern used to dynamically alter the functionality of a function, method, or class without having to use subclasses or change the source code of the function being decorated. Decorators are ideal when you need to extend the functionality of functions that you don’t want or cannot modify.
from __future__ import division, unicode_literals
import time
import random
def delayit(func):
def latency(*args, **kw):
delay = get_config()
start = time.time()
# if delay exist and bigger than 0, delaying with that value
if delay > 0:
time.sleep(delay / 1000.0)
# if delay is negative make random delays
elif delay < 0:
# add latency approx 50% of the time
if random.random() > 0.5:
# random sleep time between 1 and 10 seconds
time.sleep(random.randint(1, 10)) result = func(*args, **kw)
end = time.time() print('Added {1:.2f}ms to {0:s}'.format(
func.__name__,
(end - start) * 1000
)) return result
return latencyTo use this @delayit decorator, deploy it as a Layer (see below) and use it as follows:
from chaos_lib import delayit@delayit
def dummy():
passdef lambda_handler(event, context):
dummy()
return {
'statusCode': 200,
'body': 'Hello from Lambda!'
}This will apply the delay returned by get_config() to the function dummy().
2 — Subclassing the requests library
A subclass inherits the attributes of the parent class. You can then override some or all of the attributes, or you can also add attributes to extend the behavior of the parent class. Subclassing the requests library is useful if you want to conduct other chaos experiments within the library, like error injection or requests modification. Following is a simple subclassing of the parent class requests.Session to add delay to the request method.
class SessionWithDelay(requests.Session):
def __init__(self, delay=None, *args, **kwargs):
super(SessionWithDelay, self).__init__(*args, **kwargs)
self.delay = delay def request(self, method, url, **kwargs):
print('Added {1.2f}ms of delay to {0:s}'.format(
method, self.delay))
time.sleep(self.delay / 1000.0)
return super(SessionWithDelay, self).request(method, url, **kwargs)To use this SessionWithDelay class, deploy it as a Layer (see below) and use it as follows.
from chaos_lib import SessionWithDelaydef dummy():
session = SessionWithDelay(delay=300)
session.get('https://stackoverflow.com/')
passdef lambda_handler(event, context):
dummy()
return {
'statusCode': 200,
'body': 'Hello from Lambda!'
}For this example, I pass delay=300 as initialization parameter to the class. This means that the GET requests method will wait for 300ms before fetching the content of https://stackoverflow.com You could of course use the same get_config() to get the delay from SSM like I did in the previous example; I just wanted to show a different way of doing it.
Building the ZIP package for the Lambda Layer
Regardless if you are using Linux, Mac or Windows, the simplest way to create your ZIP package for Lambda Layer is to use Docker. If you don’t use Docker but instead build your package directly in your local environment, you might see an invalid ELF header error while testing your Lambda function. That’s because AWS Lambda needs Linux compatible versions of libraries to execute properly.
That’s where Docker comes in handy. With Docker you can very easily run a Linux container locally on your Mac, Windows and Linux computer, install the Python libraries within the container so they’re automatically in the right Linux format, and ZIP up the files ready to upload to AWS. You’ll need Docker installed first. (https://www.docker.com/products/docker).
Once you’ve installed Docker, you can do the following:
1 —Clone my small chaos experiment library
$ git clone git@github.com:adhorn/LatencyInjectionLayer.git
$ git checkout tags/v0.1-alpha2 — Spin-up a docker-lambda container, and install all the Python requirements in a directory call .vendor — you can do all this with this one-liner:
$ docker run -v $PWD:/var/task -it lambci/lambda:build-python3.6 /bin/bash -c "pip install -r python/requirements.txt -t ./python/.vendor"Note: Notice that I install the dependencies inside a folder called .vendor This is my personal preference since I like to keep my code organized. If you don’t like messing with the Python sys.path, you can also install the python requirements inside the python directory, thus avoiding the sys.path.insert(0, ‘/opt/python/.vendor’) statement in chaos_lib.py (line 4).
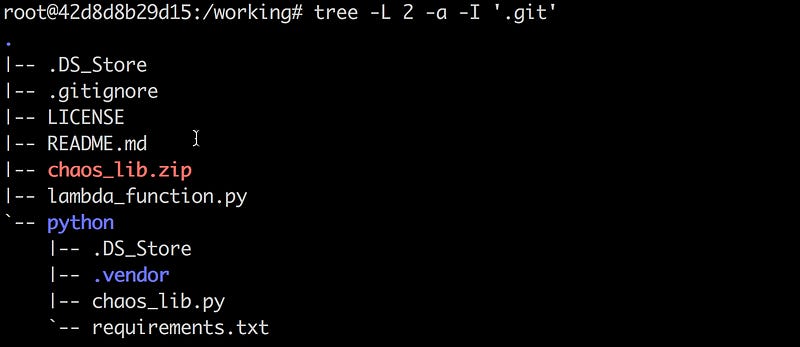
You directory structure should look like this, with .vendor filled with dependencies:
3 — Package your code by running the following command:
$ zip -r chaos_lib.zip ./pythonVoila! Your package chaos_lib.zip is now ready to be used in a Lambda Layer.
Creating a Lambda Layer from the Chaos Library
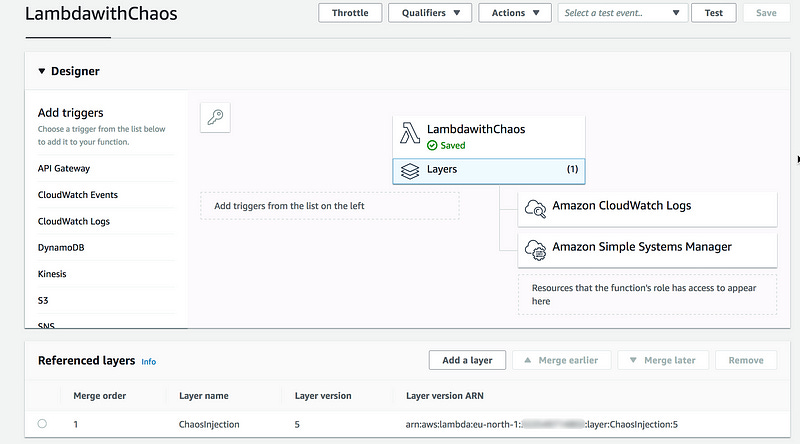
Log into the AWS Lambda Console and create a Python 3.7 compatible layer as shown in the following caption. Upload the ZIP package chaos_lib.zip created above.
Once the upload is complete, the ChaosInjection layer is published and available for use to Lambda functions.
To test the newly created layer, author a small lambda function from scratch, give it a name, e.g LambdawithChaos, select the runtime — for our example I select Python 3.7 — and give it the necessary permissions to access SSM.
The role I use, lambdassm, has the following permissions:
{
"Version": "2012-10-17",
"Statement": [
{
"Effect": "Allow",
"Action": [
"logs:CreateLogStream",
"ssm:DescribeParameters",
"logs:CreateLogGroup",
"logs:PutLogEvents"
],
"Resource": "*"
},
{
"Effect": "Allow",
"Action": [
"ssm:GetParameters",
"ssm:GetParameter"
],
"Resource": "arn:aws:ssm:eu-north-1:<YOURACCOUNTID>:parameter/chaoslambda.config"
}
]
}Once the function is created, replace the generic function code with the one below.
from chaos_lib import delayit
from chaos_lib import SessionWithDelay
def dummy2():
session = SessionWithDelay(delay=300)
session.get('https://stackoverflow.com/')
pass
@delayit
def dummy():
    pass
def lambda_handler(event, context):
dummy()
dummy2()
return {
'statusCode': 200,
'body': 'Hello from Lambda!'
}Notice how you can easily import from chaos_lib from the Lambda Layer.
from chaos_lib import delayit
from chaos_lib import SessionWithDelayThat’s because Lambda runtimes include paths in the /opt directory to ensure that your function code has access to libraries that are included in layers — and for Python (2.7, 3.6 and 3.7), the full path is /opt/python . For more information on layer path configuration, please check here.
Now, you can configure the Lambda function to use the ChaosInjection layer.
Before testing, make sure you configure your Lambda function with enough Timeout, otherwise you’ll see an error similar to Task timed out after 3.00 seconds as soon as you test the function.
Note: Lambda function timeout is the overall time it takes to initialize (cold start) and execute a function, so when injecting latency you need to take that into account.
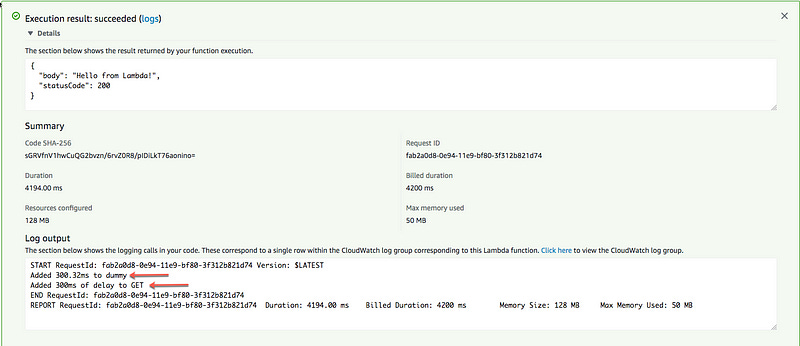
Finally, use the default test event, and click Test. You should see the execution result below.
It works!! Both the decorator @delayit and the class SessionWithDelay have 300ms latency injection by default. Now, you can experiment with different values of latency and test the resilience of your application to latency.
A word of warning before you start breaking things: please, DO NOT use that latency injection experiment in production to start with! Make sure you first experiment with latency injection in a test environment — where no real and paying customer can be affected — because latency injection will break your application, that I can guarantee!
Chaos engineering is not about breaking things randomly without a purpose, chaos engineering is about breaking things in a controlled environment and through well-planned experiments in order to build confidence in your application to withstand turbulent conditions.
Wrapping up.
That’s all for now, folks — hopefully this blog post has inspired you to start chaos engineering experiments on AWS Lambda. Feel free to comment, share your ideas or submit pull requests if you want to improve or add new functionalities to this small latency injection library.
adhorn/LatencyInjectionLayer
Small example of how to use AWS Lambda Layers to inject latency into AWS Lambda Functions …github.com
Note: If you like Python Decorators in Lambda, I suggest you also check-out the awesome project https://github.com/dschep/lambda-decorators.
Adrian
—
Subscribe to my stories here.
Join Medium for $5 — Access all of Medium + support me & others!


