
Injecting Chaos to Amazon EC2 using AWS System Manager
Ansible, Chef, and Bastion host — these are the standard, widely known tools and techniques, used to execute ad-hoc commands on remote…

Chaos Engineering on AWS


Ansible, Chef, and Bastion host — these are the standard, widely known tools and techniques, used to execute ad-hoc commands on remote servers. While brilliant, all these tools require quite a bit of setup and patience to get started with and to maintain — especially at scale. There is also no simple ways to enforce log trails from the execution of commands and especially who executed them.
The EC2 Run Command EC2, introduced in 2015, was initially built to help administer instances easily and securely. This feature was first designed to support customers running Windows workloads and remotely installing software, running ad hoc scripts or Microsoft PowerShell commands or configuring Windows Update settings.
Today, it is part of the AWS Systems Manager (SSM) offering and is available for every workload and instance type. By integrating with AWS Identity and Access Management (IAM), SSM gives more control over managing remote command executions but also provides logs of the remote commands for auditing purpose.
Finally, for commands that are frequently run, we can create SSM document.
As you will read in this post, all that makes it quite attractive for running chaos engineering experiments.
What is SSM?
SSM is an agent-based service for managing servers on any infrastructure. It acts as an operational center from which you can monitor, view and manage AWS resources — e.g., recent API activity, resource configuration changes, notifications, alerts, software inventory, and patch compliance status.
More importantly, with SSM, you can also take action — e.g., by using the EC2 Run Command — depending on your operational needs.
SSM Agent
SSM Agent is an Amazon software that can be installed and configured on an Amazon EC2 instance, an on-premises server, or a virtual machine (VM). SSM Agent makes it possible for Systems Manager to update, manage, and configure these resources. The agent processes and runs requests from SSM as specified in the SSM document. SSM Agent then sends status and execution information back to the SSM.
Installing an agent? — You might say. I know it can be scary for some. However, the source code for SSM Agent is available on GitHub so you can also adapt the agent to meet your own organizational needs.
SSM Agent is installed, by default, on Amazon Linux base AMIs dated 2017.09 and later.
SSM Agent is also installed, by default, on Amazon Linux 2, Ubuntu Server 16.04, and Ubuntu Server 18.04 LTS AMIs.
For other versions of Linux, including non-base images like Amazon ECS-Optimized AMIs — you must install the SSM agent manually. For more information on how to install the SSM agent, check here.
Once the agent is installed, or if you use the Amazon Linux based AMIs with the pre-installed agent, you need to create and attach an IAM role (more details below) to the instance. That role allows the execution of SSM commands such as Run Commands.
Note: Remember that as of February 2017, you can attach or replace an IAM role to your existing EC2 instance.
Run Command
Run Command lets you remotely and securely manage the configuration of your instances, and not only EC2 instances, but also the ones configured in your hybrid environment. That includes on-premises servers and virtual machines (VMs) and even VMs in other cloud environments set for use with Systems Manager.
Run Command allows you to automate DevOps tasks or perform ad-hoc configuration updates, regardless of the size of your fleet.
For ad-hoc changes, you can use the AWS console. For regular tasks requiring automation, you can use either the AWS CLI, the AWS Tools for Windows PowerShell, or the AWS SDKs.
While Run Command is mostly used for tasks such as installing or bootstrapping applications, capturing log files or joining instances to a Windows domain, Run Command is also particularly well-suited to perform chaos experiments.

SSM Document
An SSM document defines the actions that Systems Manager performs on your instances. SSM documents use JSON or YAML format, and they include steps and parameters that you specify to perform your failure injection. These SSM documents are useful since they allow you to (1) create and save different versions of your documents and specify the default version for each SSM document. Changing or updating the content of the SSM document will automatically increment the version of the SSM document.
You can (2) tag your SSM documents to help you identify your SSM documents — for example, tag documents for a specific application or environment. You can also restrict access to SSM documents by creating an IAM policy that specifies the tags that a particular user or group can use. That is particularly useful for failure injections that you want to perform, safely, in production.
And finally, (3) you can share your documents by making them public or sharing them with specific AWS accounts. That, again, is useful to enable re-usability across several teams.
An SSM document is pretty self-explanatory and looks like this:
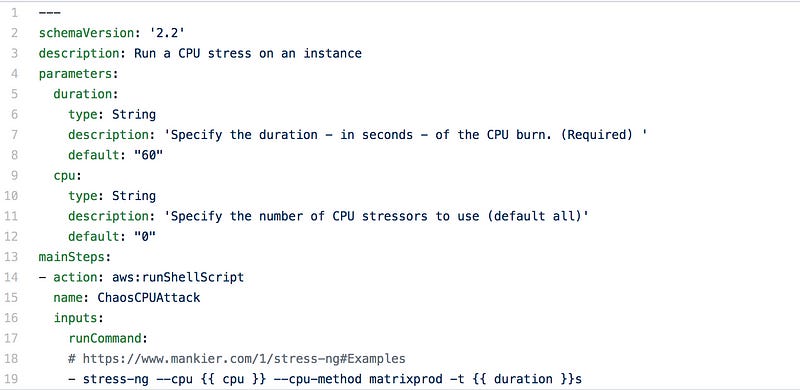
SSM Run Command is a pretty good — none-purpose built tool — to perform failure injections and ideal to get started with Chaos Engineering.

Nuff said — Let’s do this!
I will assume that you either already have EC2 instances launched with SSM agent installed (running Amazon Linux for example) or that you know how to start one. If you don’t, please see here.
1- Create an IAM role for your EC2 instances
By default, SSM doesn’t have permission to perform actions on your EC2 instances, even if the agent is pre-installed. You must grant access by using an IAM instance role.
You can start by creating a role — e.g., Chaos-SSM — with the default policy AmazonSSMManagedInstanceCore to give the EC2 instances access to the SSM service.
Or copy-paste the following policy based on the default one, but only allowing EC2 instances tagged with SSMTag: chaos-ready to talk with SSM.
{
    "Version": "2012-10-17",
    "Statement": [
        {
            "Effect": "Allow",
            "Action": [
                "ssm:DescribeAssociation",
                "ssm:GetDeployablePatchSnapshotForInstance",
                "ssm:GetDocument",
                "ssm:DescribeDocument",
                "ssm:GetManifest",
                "ssm:GetParameter",
                "ssm:GetParameters",
                "ssm:ListAssociations",
                "ssm:ListInstanceAssociations",
                "ssm:PutInventory",
                "ssm:PutComplianceItems",
                "ssm:PutConfigurePackageResult",
                "ssm:UpdateAssociationStatus",
                "ssm:UpdateInstanceAssociationStatus",
                "ssm:UpdateInstanceInformation"
            ],
            "Resource": "*",
            "Condition": {
                "StringLike": {
                    "ssm:resourceTag/SSMTag": "chaos-ready"
                }
            }
        },
        {
            "Effect": "Allow",
            "Action": [
                "ssmmessages:CreateControlChannel",
                "ssmmessages:CreateDataChannel",
                "ssmmessages:OpenControlChannel",
                "ssmmessages:OpenDataChannel"
            ],
            "Resource": "*"
        },
        {
            "Effect": "Allow",
            "Action": [
                "ec2messages:AcknowledgeMessage",
                "ec2messages:DeleteMessage",
                "ec2messages:FailMessage",
                "ec2messages:GetEndpoint",
                "ec2messages:GetMessages",
                "ec2messages:SendReply"
            ],
            "Resource": "*"
        }
    ]
}
You can of course further restrict the policy to your own needs.
If you want — and you probably should — to output the SSM Run Command into an S3 bucket, attach the following policy to your role as well.
{
    "Version": "2012-10-17",
    "Statement": [
        {
            "Effect": "Allow",
            "Action": [
                "s3:GetObject",
                "s3:PutObject",
                "s3:PutObjectAcl"
            ],
            "Resource": "arn:aws:s3:::<YOUR OUTPUT BUCKET NAME>/*"
        }
    ]
}
IMPORTANT: Please don’t use
“Resource”: “*”on this one as it would grant any ec2 instances the permission to read and write into all you S3 buckets. Give permissions with the least privilege principle — always.
Once you have created the role, attached it to the instance(s) of your choice.
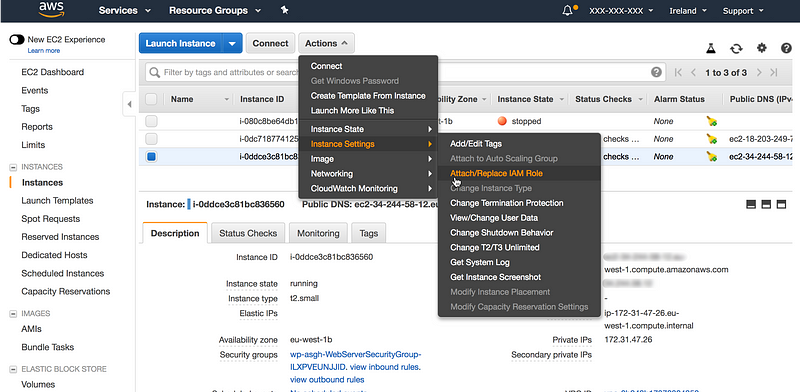

Chaos-SSM role to the EC2 instanceAnd finally, make sure to tag them with SSMTag: chaos-ready.

2- Chaos injection documents
To get started, I created a few pre-defined documents to run common failure injections with SSM Run Command.
adhorn/chaos-ssm-documents
Collection of Amazon SSM Documents to perform Chaos Engineering experiments. - adhorn/chaos-ssm-documentsgithub.com
Currently, the following failure injections are available — feel free to ask or contribute for more!
1- CPU burn injection
2- IO stress injection
3- Memory stress
4- Latency injection
5- Blackhole injection
Update: many more are now available.
To use them, upload them via the AWS console or using the AWS CLI.
> git clone git@github.com:adhorn/chaos-ssm-documents.git> cd chaos-ssm-documents/run-command> aws ssm create-document --content file://cpu-stress.yml --name "cpu-stress" --document-type "Command" --document-format YAMLYou can also use the provided script to upload them all-at-once in your preferred AWS region, e.g., eu-west-1
> ./upload-document.sh -r eu-west-1 After uploading the documents, you should see them under the Owned by me tab in AWS System Manager Documents.


3- Running chaos injection commands
Go to the Run Command dashboard in the AWS System Manager.

Filter the documents by Owner: Owned by me and you should see all the different documents uploaded. Select the cpu-stress, for example, as it is easy to monitor its execution.

Notice the parameters defined in the cpu-stress document are here, namely duration with a default of 60 and CPU with a default of 0 (all). You can choose the instances that you want to target. Remember that only those with the role Chaos-SSM created earlier will allow the execution of the Run Command.
You can also select your instances by tags or by resource group. In this example, I decide to choose my target instances manually.
You can also select to output the result of the Run Command to S3 and CloudWatch logs.
Before running the experiment, log into the targeted instance(s) and run htop, that way, you will be able to monitor the CPU usage of your instance.

Now, let the monkey out and click RUN!
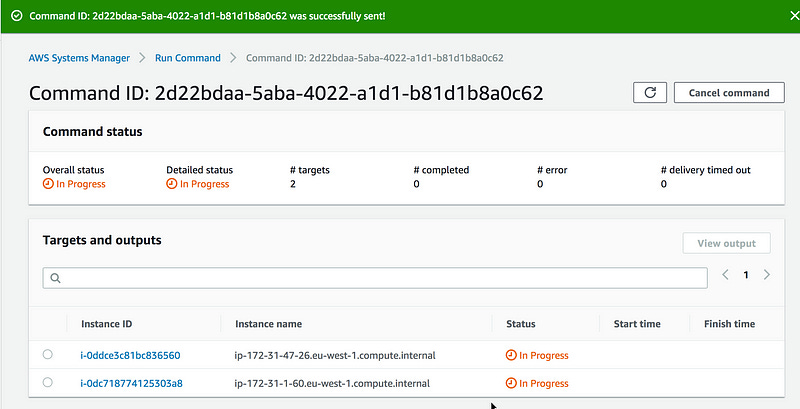
Notice that you can also run the command using the CLI.
> aws ssm send-command --document-name "cpu-stress" --document-version "1" --targets '[{"Key":"InstanceIds","Values":["i-0dc718774125303a8","i-0ddce3c81bc836560"]}]' --parameters '{"duration":["60"],"cpu":["0"]}' --timeout-seconds 600 --max-concurrency "50" --max-errors "0" --output-s3-bucket-name "adhorn-chaos-ssm-output" --region eu-west-1You should see the command ID and its status as below.
And you should also see the CPU in the target instances going through the roof.

4- Cancelling commands
You might have noticed something interesting in the command status page — do you see the Cancel Command?

Yes — that’s our Big Red Button right there! You can “attempt” (more on that soon) to cancel a command as long as the service shows it is in either a Pending or Executing state.
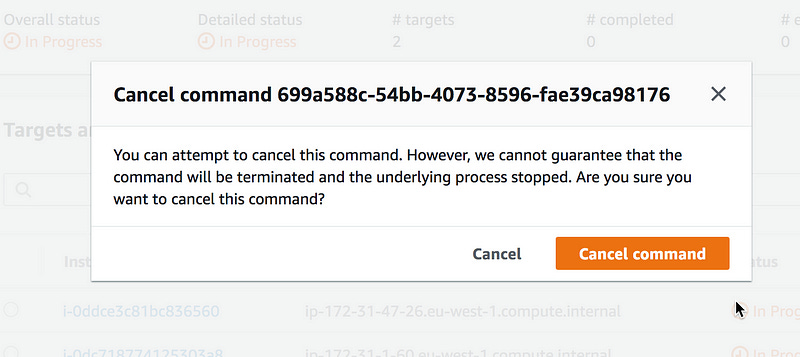
You can cancel the command via the AWS CLI as well. Just make sure to replace the value of —-command-id with the ID of the Run Command output:
> aws ssm cancel-command --command-id "9bd0fc52-f271-421a-9bd9-c3a83f907c9c" --region eu-west-1BUT— and yes, sadly there is a but.
As mentioned earlier, SSM can only “attempt” to cancel a command. Indeed, SSM cannot guarantee that the command will be terminated and the underlying process stopped. In which case, the command will execute for the duration you have set up in the run command input.
In the SSM documents provided in my Git repo, blackhole-stress and latency-stress are two such chaos injection examples that cannot be stopped via the SSM cancel command. However, they do have an execution duration followed by a revert command — e.g for blackhole-stress, the command runs as follows:
runCommand:
- iptables -A INPUT -p {{ protocol }} --dport {{ port }} -j DROP                           - iptables -A OUTPUT -p {{ protocol }} --dport {{ port }} -j DROP                           - sleep {{ duration }}
- iptables -D INPUT -p {{ protocol }} --dport {{ port }} -j DROP                           - iptables -D OUTPUT -p {{ protocol }} --dport {{ port }} -j DROP
The first two rules drop any packets from a particular protocol and port combination coming into your system. Then, run command sleep for the duration you have given in the run command input. Finally, the first two commands are deleted.
Latency-stress works similarly:
runCommand:
- tc qdisc del dev {{ interface }} root
- tc qdisc add dev {{ interface }} root netem delay {{ delay }}ms                           - sleep {{ duration }}
- tc qdisc del dev {{ interface }} root netem delay {{ delay }}ms
Not perfect, but pretty good to me — and plenty enough to get started with chaos engineering and learn about the techniques and methods used.
SOME WORDS OF CAUTION BEFORE YOU START BREAKING THINGS
To begin with, DO NOT use these chaos injection commands in production blindly!!
Always review the SSM documents and the commands in them.
Make sure your first chaos injections are done in a test environment and on test instances where no real and paying customer can be affected.
Test, test, and test more. Remember that chaos engineering is about breaking things in a controlled environment and through well-planned experiments to build confidence in your application — and you own tools — to withstand turbulent conditions.
That’s all for now, folks! Hopefully, this blog post has inspired you to start chaos engineering experiments using SSM Run Command on your EC2 instances and containers. Feel free to comment, share your ideas, or submit pull-requests if you want to add new functionalities to this small collection of documents.
adhorn/chaos-ssm-documents
Collection of Amazon SSM Documents to perform Chaos Engineering experiments. - adhorn/chaos-ssm-documentsgithub.com
Adrian
—
Subscribe to my stories here.
Join Medium for $5 — Access all of Medium + support me & others!