Chaos Engineering on AWS
I’d like to express my gratitude to my colleagues and friends Jason Byrne and Matt Fitzgerald for their valuable feedback.
In a recent post, I explained how to use AWS SSM Run Command to inject failures on EC2 instances. SSM Run Command is well-suited to execute custom scripts on EC2 instances, especially to inject latency or blackouts on the network interface, do resource exhaustion of CPUs, memory, and IO.
However, we need more than that. Failure injection should target resources, network characteristics and dependencies, applications, processes and service, and also the infrastructure.
We also need to have a broad set of controls and capabilities to perform chaos experiments safely. We might want to:
Execute commands and scripts directly into EC2 instances.
Invoke Lambda functions to run custom scripts.
Orchestrate several failure injections to form chaos scenarios.
Schedule them for execution at specific times.
Have automatic cancellations if errors are detected.
Have safety measures in places with approvals.
Apply velocity controls to limit the blast radius of experiments.
That is where AWS System Manager Automation (SSM** Automation) comes in. So, let’s take a look!
** Note: AWS Systems Manager was formerly known as Amazon Simple Systems Manager (SSM). The original abbreviated name of the service, SSM, is still used and reflected in various AWS resources.
What is SSM Automation?
SSM Automation was launched to simplify frequent maintenance and deployment tasks of AWS resources and, especially, codify them.
SSM Automation uses documents (defined in YAML or JSON) to enable resource management across multiple accounts and AWS regions. You can execute AWS API calls as part of a document in combination with other SSM Automation actions such as running commands on your EC2 instances, invoking Lambda functions, and executing custom Python or Powershell scripts.
While these documents can be executed directly via the console, the CLI, and SDKs, you can also schedule and trigger them through CloudWatch Events. This scheduling capability makes the integration with CI/CD pipelines trivial.
SSM Automation Action types
Action types let you automate a wide variety of operations. For example, the aws:executeAwsApi action type used above enables you to run any API operation on any AWS service, including creating or deleting AWS resources, starting processes, triggering notifications, etc.
While SSM Automation supports a wide variety of actions, the most notable ones for chaos engineering are the following:
aws:executeAwsApi — Call and run AWS API actions
aws:changeInstanceState — Change instance state
aws:runCommand — Run a command on an EC2 instance
aws:executeScript — Run a Python or PowerShell script
aws:invokeLambdaFunction — Invoke an AWS Lambda function
aws:assertAwsResourceProperty — Assert a resource state or event state
aws:waitForAwsResourceProperty — Wait on a resource property
aws:pause — Pause an SSM Automation execution
aws:sleep — Delay an SSM Automation execution
aws:approve — Pause an SSM Automation execution for manual approval
SSM Automation also includes safety and velocity features that help you control the execution and the roll-out of these documents across large groups of instances by using tags, limits, and error thresholds you define.
As you can probably guess by now, SSM Automation is also well-suited to execute chaos engineering experiments safely.
“Hello, World!”
Let’s take a look at the “Hello, World!” of chaos engineering experiments — Randomly stopping EC2 instances.
This experiment is famously known as Chaos Monkey, and was created by Netflix to enforce strong architectural guidelines; Applications launched on the AWS cloud must be stateless auto-scaled micro-services. That means that applications running Netflix should tolerate random EC2 instance failures.
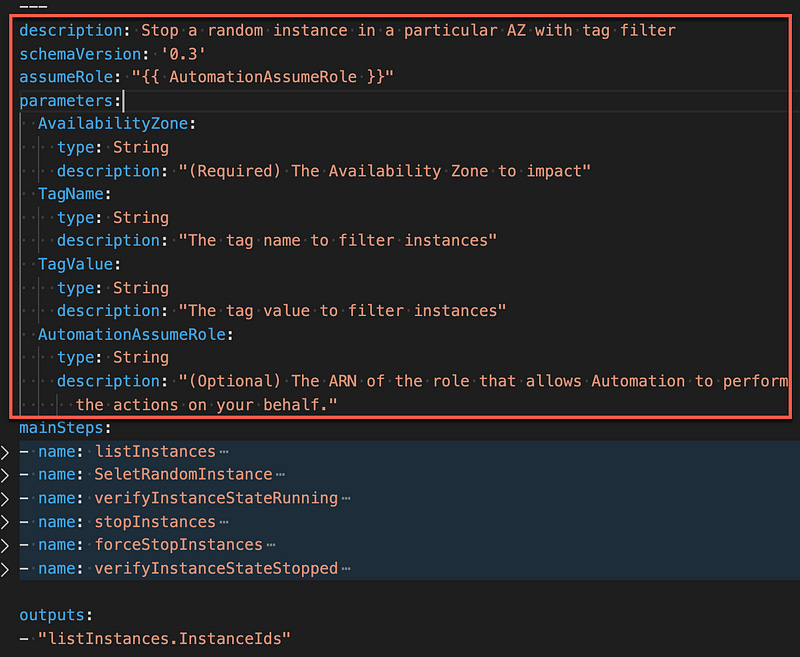
Following is an SSM Automation document (described in YAML) randomly failing an EC2 instance in a particular AWS availability zone.
To open that SSM Automation document in your favorite IDE, click here.
Okay — so what do we have here?
Note: For readability purposes, I will now collapse irrelevant sections of the SSM Automation document.
The top section of this document is simple. It starts with a description, the schemaVersion (currently at 0.3 ), and assumeRole, which is the IAM role that SSM Automation needs to assume to run the actions defined below in the document.
The parameters section — AvailabilityZone, TagName, TagValue, and AutomationAssumeRole — are parameters operators need to input for each experiment’s execution. The first three parameters are used in the first step — ListInstances — to filter EC2 instances, while the last one is the IAM role required to execute actions described in the document.
These parameters are inputs of the experiment execution, in bold in the below AWS CLI start-automation-execution command:
> aws ssm start-automation-execution --document-name "StopRandomInstances-API" --document-version "\$DEFAULT" --parameters '{"AvailabilityZone":["eu-west-1c"],"TagName":["SSMTag"],"TagValue":["chaos-ready"],"AutomationAssumeRole":["arn:aws:iam::01234567890:role/SSMAutomationChaosRole"]}' --region eu-west-1mainSteps
The mainSteps section defines actions that SSM performs on AWS resources. In this document there are six steps that run in sequential order — namely listInstances, SelectRandomInstance, verifyInstanceStateRunning, stopInstances, forceStopInstances, and verifyInstanceStateStopped.
Each of these steps defines a single SSM Automation action type. The output from one step can be used as input in the following step.
First step — listInstances
Let’s take a look at the first step listInstances. This first step uses an action type aws:executeAwsApi to query the EC2 service for a list of instances filtered by availability-zone, the state of the EC2 instance, and its tags.
Outputs
As explained earlier, the output from one step can be used as input in the following step. SSM Automation uses a JSONPath expression in the selector to help select the proper output.
A JSONPath expression is a string beginning with “$.” used to select one or more components within a JSON element (e.g., the output of the DescribeInstances API call). The JSONPath operators that are supported by SSM Automation are:
Dot-notated child (.): This operator selects the value of a specific key from a JSON object.
Deep-scan (..): This operator scans a JSON element level by level and selects a list of values with the specific key. The return type of this operator is always a JSON array. This operator can be either StringList or MapList.
Array-Index ([ ]): This operator gets the value of a specific index from a JSON array.
In this first step, the output “$.Reservations..Instances..InstanceId” returns a list of InstanceIds filtered by availability-zone, state, and tag.
Second step — SeletRandomInstance
The second step of the document uses an action type aws:executeScript that execute an inline Python script, which returns a random InstanceId from a list of InstanceIds.
Note: The function defined in the handler must have two parameters, events and context.
The output of script execution is a Payload object on which you can execute the JSONPath selector. In this example, $.Payload.InstanceId.
Third step — verifyInstanceStateRunning
The third step of the document uses another type of action, aws:waitForAwsResourceProperty, that asserts the state of the random InstanceId returned from step two.
In that step, the selector checks the state of the instances to make sure they are running. I want to make sure all instances are running before messing with them.
Note: As you may have noticed, the input is a StringList, but with a single item, InstanceId. That allows us to easily modify the random function from the previous step to return several items instead, without having to change anything else in the document.
Fourth and Fifth step — stopInstances and forceStopInstances
The fourth and fifth steps of the document use the action type aws:changeInstanceState. As you have probably guessed, these steps change the state of EC2 instances — in that example, to stopped. The input is again the InstanceId from step two.
Why use stopInstances and forceStopInstances steps?
In the stopInstances step, the EC2 control plane attempts to gracefully shutdown the selected EC2 instance, allowing it to flush its file system caches or file system metadata. However, sometimes, there may be an issue with the underlying host computer, and the instance might get stuck in the stopping state. That is why the forceStopInstances step set Force to true, which forces the instances to stop.
Note 1: The second step, forceStopInstances, is not recommended for EC2 instances running Windows Server.
Note 2: The default timeout value for the aws:changeInstanceState action is 3600 seconds (one hour). You can limit or extend the timeout by specifying the timeoutSeconds parameter.
For more information on EC2 stop-instances API, click here. For troubleshooting errors, click here.
Last step — verifyInstanceStateStopped
Finally, the last step of this document is to verify the state of the instances to be stopped or terminated. This step is arguably redundant since aws:changeInstanceState also asserts on the desired value. However, for the sake of this example, I preferred to make that step explicit.
Nuff said — Let’s demo this!
For this example, I will assume that you already have some EC2 instances launched in your AWS account with appropriate tags (I use SSMTag:chaos-ready for the demo).
1- Create an IAM role for SSM Automation
By default, SSM doesn’t have permission to perform actions on your AWS resources. Start by creating a role — e.g., SSMAutomationChaosRole with the following policy.
{
    "Version": "2012-10-17",
    "Statement": [
        {
            "Effect": "Allow",
            "Action": [
                "lambda:InvokeFunction"
            ],
            "Resource": [
                "arn:aws:lambda:*:*:function:ChaosAutomation*"
            ]
        },
        {
            "Effect": "Allow",
            "Action": [
                "ec2:StartInstances",
                "ec2:RunInstances",
                "ec2:StopInstances",
                "ec2:TerminateInstances",
                "ec2:DescribeInstances",
                "ec2:DescribeInstanceStatus"
            ],
            "Resource": [
                "*"
            ]
        },
        {
            "Effect": "Allow",
            "Action": [
                "ssm:*"
            ],
            "Resource": [
                "*"
            ]
        },
        {
            "Effect": "Allow",
            "Action": [
                "sns:Publish"
            ],
            "Resource": [
                "arn:aws:sns:*:*:ChaosAutomation*"
            ]
        }
    ]
}
It should give you enough to get started with actions calling EC2, SSM Run Command, and AWS Lambda. You should, of course, extend or restrict this policy to your own needs.
2- Fault injection documents
To get you started, I created a few ready-to-use SSM Automation documents.
https://github.com/adhorn/chaos-ssm-documents/
Currently, the following chaos experiments are available — feel free to ask or contribute for more!
1- Randomly stopping instances using EC2 API
2- Randomly stopping instances using AWS Lambda
3- Injecting multiple CPU stresses on EC2 instances using AWS Run Command
To use any of them, you need to create a SSM Automation document using the AWS CLI as follows:
> aws ssm create-document --content --name "StopRandomInstances-API" file://stop_random_instance_api.yml --document-type "Automation" --document-format YAMLAfter uploading the document, you should see it under the Owned by me tab in AWS System Manager Documents filtered by Document type: Automation .
3- Executing the fault injection document
Go to the Automation dashboard in the AWS System Manager and click Execute automation.
Filter the documents by Owner: Owned by me, and you should see your newly uploaded document(s).
Select the StopRandomInstances-API automation document and click Next.
Note: If you prefer using the AWS CLI, notice that the console outputs the AWS CLI command execution equivalent.
You enter the input parameters defined in the automation document here, namely AvailabilityZone, TagName, and TagValue (I use SSMTag:chaos-ready). Remember to select the correct role created earlier, in this demo SSMAutomationChaosRole, to allow the execution of the experiment.
Before running the experiment, let’s take a look at my instances currently running in eu-west-1.
As you can see, I have four instances in eu-west-1a but only three with the correct tag SSMTag:chaos-ready. I will use that information to verify that my filters are working correctly.
Let’s execute the experiment.
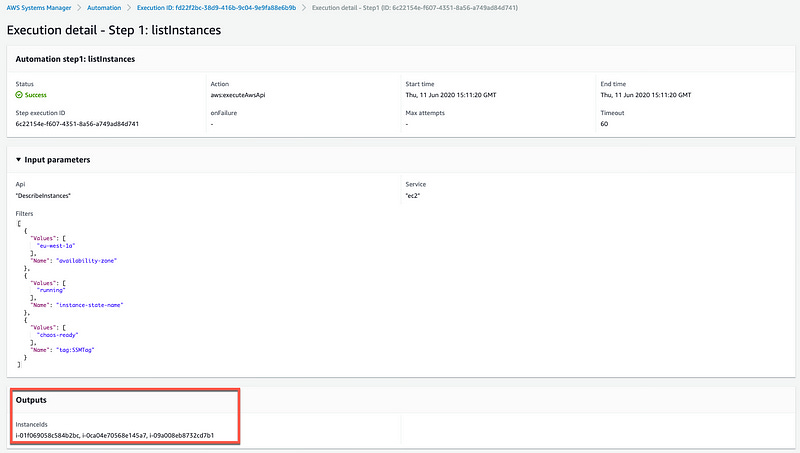
You can follow the execution of each step from the AWS Console. Each step gets a Step ID that you can monitor independently. Following is a zoom on Step 1: listInstances.
We can now check and verify that our filters work. And indeed, we have three instances with the correct set of tags in eu-west-1a.
A zoom on the second step shows us the randomly selected instance: i-01f069058c584b2bc.
Once all the steps completed successfully, we can verify that the correct instance stopped — i-01f069058c584b2bc
As you can see, our EC2 fault injection worked.
4- Cancelling Executions
You might have noticed the Cancel execution in the execution status page.
Yes — that’s our Big Red Button right there!
CAUTION: You can only attempt to cancel an execution since SSM cannot guarantee that actions can be stopped or reverted. For example, you can’t undo an activity that is already happening, e.g., stopping and terminating an instance.
As always, with chaos engineering, be extra careful with your experiments — plan carefully!
5 — Continuous Chaos testing
What made Chaos Monkey so unique was that is was continuously running in Netflix’s environment, regularly shutting down EC2 instances, at a regular interval — it wasn’t just a one-off.
Now that you have successfully executed your EC2 failure injection with SSM Automation, you might want to turn that into a continuous chaos test, or continuous verification.
Continuous chaos testing simply means that you regularly execute the failure injection to verify the application repeatedly withstand failures.
Luckily, it is straightforward to do!
You can execute the above SSM Automation by specifying our SSM document as the target of an Amazon CloudWatch event.
Open the CloudWatch console, choose Events in the left navigation pane, and click Create rule.
Choose Schedule and specify the recurrence by using the cron format. For demo purposes, I choose to execute the SSM Automation document every 5 minutes, which is represented by the Cron expression
0/5 * * * ? *.Then click Add target and choose SSM Automation from the Select target type list. Choose the Automation document created above as your target- StopRandomInstances-API.
Expand Configure automation parameter(s), and enter each of the required values —
AvailabilityZone,TagName,TagValueandAutomationAssumeRole.In the permissions section, let CloudWatch create a new role to call SSM Automation Execution, or select an existing one.
Click Configure details, add a name and a description. Select
Enabledstate and click Create rule. Make sure you add a distinct name with an accurate description; you want to make it apparent what is it a chaos engineering rule!
You can verify, change, or disable the rule from the CloudWatch console afterward.
After a while, you should start seeing executions of the SSM Automation document every 5 min.
As you can see, the last four executions differ and hold the IAM role assumed by the CloudWatch event calling SSM Automation execution.
That’s it — We have successfully built our custom Chaos Monkey using SSM Automation! Hopefully, this blog post will inspire you to start your journey with chaos engineering. Feel free to comment, share your ideas, or submit pull-requests if you want to add new functionalities to this collection of SSM documents.
Note for serverless fans: If you are interested in doing the same experiment but with actions using AWS Lambda, use this document with this lambda function.
Adrian
—
Subscribe to my stories here.
Join Medium for $5 — Access all of Medium + support me & others!


